Monthly Archives: November 2013
Illustrator Board Design – GIT 230
Board Frames
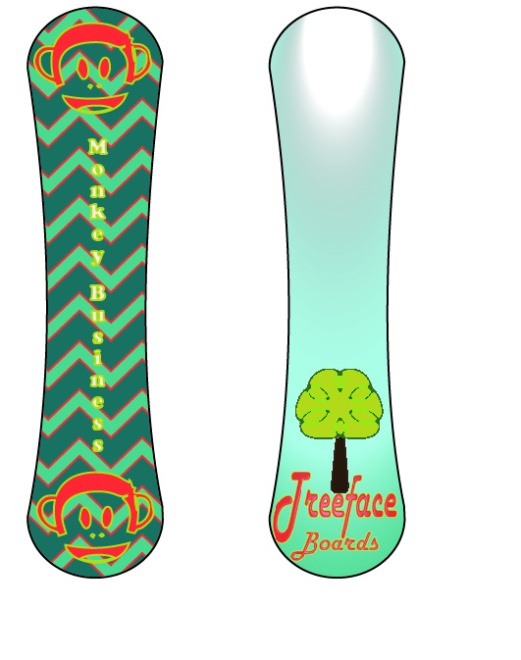
I started by drawing the frame of the boards with 2 ellipses and a rounded rectangle between the ellipses. I added anchor points to the rectangle and then pinched in the center of the rectangle so the middle looked like a snowboard. I then used the shape creator tool to merge all of the shapes. I duplicated that shape to create the back of the board.
I downloaded a Kuler color palate (Theme 46) from the Adobe site that I liked.
Front of the Board
I used the line tool to create a line at a 45 degree angle. I then reflected and copied the line to make the top of the chevron pattern. Then I joined the 2 lines and reflected again. I transformed the lines until I liked the shape of the chevron. Once I had the base of the chevron pattern created, I duplicated it and lined them up down the board. I used the board as a clipping mask over the chevron pattern I created.
I downloaded a picture of Julius Jr. (a character on a Nick Jr. show that my son loves) and I used the selection tool in Photoshop to select only his face. I placed the monkey face into Illustrator and traced the image to make it a one color image with a stroke outlines. I then duplicated the monkey face and placed the image on the top and bottom of the board. The text on the front of the board I used a vertical type tool.
Back of the Board
I selected the entire board and applied a gradient. I used a radial gradient, applied the Kuler color scheme I downloaded, adjusted the position and radius of the gradient. On the type, I changed the baseline of the T and then turned the type into outlines. I applied a plastic wrap effect. I created the tree in illustrator by using the ellipse and rounded rectangle tool. I used the shape builder tool to merge parts of the ellipses in the top of the tree and then used live paint to bring out selected lines in the stroke. I then used the fish eye effect to distort the tree a little more.
The colors look a bit different here than they do in Illustrator.

